

In my Last Blog Post, I’ve discussed how we can use an SVG image in a Xamarin Forms project, leveraging the power of vector based images by stretching it to the given dimensions without losing the image quality.
For this post, I’ve modified a bit the solution from the last post and will use this solution as the base for the changes I will be describing in here.
Our final goal here is to create an SVG image control, which we can pan, zoom and double tap it to zoom to fit.
TL;DR Version
If all you want is the code and you can handle it yourself,
Feel free to check the example on my GitHub.
Introduction
Reading this post, you might ask yourself two main questions:
- Why would you need to pan/zoom an image? Sounds very redundant!
Especially since in the last post we talked only about icons, which in most cases are static. - Shouldn’t it be very easy? Xamarin Forms supports Scale and Translate out of the box for all views.
And you would be absolutely right!
Why to Pan/Zoom an SVG image
Although one of the most popular usages of SVG files is indeed for drawing icons,
Another good use for SVGs are schemes and illustrations.
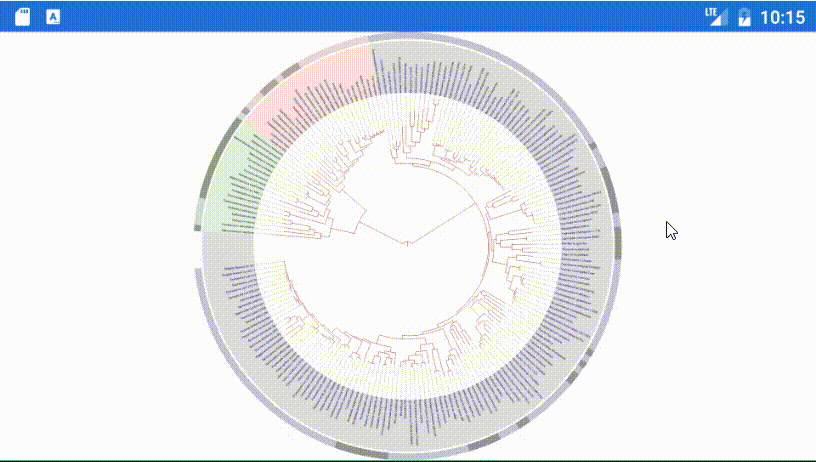
To give a more concrete example, I’ll be using this tree of life image throughout the post.

Xamarin Forms built in Scale and Transform
Although it is possible to scale and translate xamarin form views,
Since SVG is drawn on a canvas, scaling it won’t make the SVG scale, just the view.
It will result in a terrible pixelation.
For example, if we would scale the image from the previous post,
Here is what we will get (Click the image to see it in full size):
To avoid this situation, we need to smartly prepare the canvas before drawing the image.
So, without further ado,
Preparations
Reminder
As a reminder, here is the code of our SVG image.
Note, the name of the class is changed to reflect our current needs.
public class InteractiveSvg : Frame
{
    private readonly SKCanvasView _canvasView = new SKCanvasView();

    public static readonly BindableProperty ResourceIdProperty = BindableProperty.Create(
        nameof(ResourceId), typeof(string), typeof(InteractiveSvg), default(string), propertyChanged: RedrawCanvas);

    public string ResourceId
    {
        get => (string)GetValue(ResourceIdProperty);
        set => SetValue(ResourceIdProperty, value);
    }

    public InteractiveSvg()
    {
        Padding = new Thickness(0);
        Content = _canvasView;
        _canvasView.PaintSurface += CanvasViewOnPaintSurface;
    }

    private static void RedrawCanvas(BindableObject bindable, object oldvalue, object newvalue)
    {
        InteractiveSvg interactiveSvg = bindable as InteractiveSvg;
        interactiveSvg?._canvasView.InvalidateSurface();
    }

    private void CanvasViewOnPaintSurface(object sender, SKPaintSurfaceEventArgs args)
    {
        SKCanvas canvas = args.Surface.Canvas;
        canvas.Clear();

        if (string.IsNullOrEmpty(ResourceId))
            return;

        using (Stream stream = GetType().Assembly.GetManifestResourceStream(ResourceId))
        {
            SKSvg svg = new SKSvg();
            svg.Load(stream);

            SKImageInfo info = args.Info;
            canvas.Translate(info.Width / 2f, info.Height / 2f);

            SKRect bounds = svg.ViewBox;
            float ratio = bounds.Width > bounds.Height
                ? info.Height / bounds.Height
                : info.Width / bounds.Width;

            canvas.Scale(ratio);
            canvas.Translate(-bounds.MidX, -bounds.MidY);

            canvas.DrawPicture(svg.Picture);
        }
    }
}
Initial Changes
Since we are going to redraw the SVG each time it is manipulated,
We don’t want to load the SVG each time the PaintSurface event is raised.
Therefore, let’s load the SVG on the ResourceId property changed handler and save the picture as a private member.
New Member
private SKPicture _svgPicture;
SVG Load Method
private void LoadSvgPicture()
{
    using (Stream stream = GetType().Assembly.GetManifestResourceStream(ResourceId))
    {
        SKSvg svg = new SKSvg();
        svg.Load(stream);

        _svgPicture = svg.Picture;
    }
}
Adjust Property Changed Callback
private static void RedrawCanvas(BindableObject bindable, object oldvalue, object newvalue)
{
    InteractiveSvg interactiveSvg = bindable as InteractiveSvg;
    interactiveSvg?.LoadSvgPicture();
    interactiveSvg?._canvasView.InvalidateSurface();
}
Adjust PaintSurface Event Handler
Here we will have to perform a couple of changes:
- Remove the loading of the SVG
- Get the bounds of the SVG image from the SKPicture private member, and not the SKSvg object.
private void CanvasViewOnPaintSurface(object sender, SKPaintSurfaceEventArgs args)
{
    SKCanvas canvas = args.Surface.Canvas;
    canvas.Clear();

    if (string.IsNullOrEmpty(ResourceId))
        return;

    if (_svgPicture == null)
        return;

    SKImageInfo info = args.Info;
    canvas.Translate(info.Width / 2f, info.Height / 2f);

    SKRect bounds = _svgPicture.CullRect;
    float ratio = bounds.Width > bounds.Height
        ? info.Width / bounds.Width
        : info.Height / bounds.Height;

    canvas.Scale(ratio);
    canvas.Translate(-bounds.MidX, -bounds.MidY);

    canvas.DrawPicture(_svgPicture);
}
Important Note
In a realistic scenario, we should consider the density on Android and the scale in iOS.
However, since this is not the main goal of the post,
I’ve simply set it to be 1:1 to avoid further complication in calculations.
Let’s Code
Add Gestures
For our picture to be interactive, we are going to use the built in gestures that Xamarin Forms provides us.
If you are not familiar with the gestures mechanics of Xamarin Forms,
I strongly advice you to read THIS ARTICLE about gestures before you continue reading.
We are going to use the gestures in the following way:
- Pan Gesture – Move our picture around
- Pinch Gesture – Zoom in/out
- Double Tap Gesture – Revert everything and show the whole picture
So for starters, let’s create a method that will create the gestures and add them to our canvas view.
private void InitializeGestures()
{
    PanGestureRecognizer panGestureRecognizer = new PanGestureRecognizer();
    panGestureRecognizer.PanUpdated += MovePicture;

    PinchGestureRecognizer pinchGestureRecognizer = new PinchGestureRecognizer();
    pinchGestureRecognizer.PinchUpdated += ZoomPicture;

    // Note the NumberOfTapRequired property we initialize in the TapGestureRecognizer
    TapGestureRecognizer doubleTapGestureRecognizer = new TapGestureRecognizer { NumberOfTapsRequired = 2 };
    doubleTapGestureRecognizer.Tapped += ZoomToFit;

    _canvasView.GestureRecognizers.Add(panGestureRecognizer);
    _canvasView.GestureRecognizers.Add(pinchGestureRecognizer);
    _canvasView.GestureRecognizers.Add(doubleTapGestureRecognizer);
}

private void MovePicture(object sender, PanUpdatedEventArgs e) { }

private void ZoomPicture(object sender, PinchGestureUpdatedEventArgs e) { }

private void ZoomToFit(object sender, EventArgs e) { }
And of course, let’s call our new method in the constructor:
public InteractiveSvg()
{
    Padding = new Thickness(0);
    Content = _canvasView;
    _canvasView.PaintSurface += CanvasViewOnPaintSurface;
    InitializeGestures();
}
Pan Gesture – Move our picture around
Since we are going to move our picture around, we need to save some values for later:
- X and Y values for our translations.
- X and Y initial values when the gesture starts
private float _x;
private float _y;

private float _xGestureStart;
private float _yGestureStart;
Now, let’s add a method, which will receive values to update and invalidate the canvas surface.
(We will be using this method in other handlers in the next sections)
private void UpdateImageProperties(float x, float y)
{
    _x = x;
    _y = y;
    _canvasView.InvalidateSurface();
}
And finally, let’s implement the gesture event handler:
private void MovePicture(object sender, PanUpdatedEventArgs e)
{
    switch (e.StatusType)
    {
        case GestureStatus.Started:
            _xGestureStart = _x;
            _yGestureStart = _y;
            break;
        case GestureStatus.Running:
            UpdateImageProperties((float)e.TotalX + _xGestureStart, (float)e.TotalY + _yGestureStart);
            break;
    }
}
As you can see, the logic is not too complicated:
- Save the initial values on gesture start
- Update properties based on the delta between the total move and the start value
Now comes the tricky part
We need to draw the image based on the translation, which looks as an easy task at first glance,
But, since we already altered the canvas surface matrix with a scale and a translation to draw our image scaled and centered in the canvas, we need to take that into account.
Here is what we get:
private void CanvasViewOnPaintSurface(object sender, SKPaintSurfaceEventArgs args)
{
    SKCanvas canvas = args.Surface.Canvas;
    canvas.Clear();

    if (string.IsNullOrEmpty(ResourceId))
        return;

    if (_svgPicture == null)
        return;

    SKImageInfo info = args.Info;
    canvas.Translate(info.Width / 2f, info.Height / 2f);

    SKRect bounds = _svgPicture.CullRect;
    float ratio = bounds.Width > bounds.Height
        ? info.Height / bounds.Height
        : info.Width / bounds.Width;

    canvas.Scale(ratio);
    canvas.Translate(-bounds.MidX, -bounds.MidY);

    float scaledX = _x / canvas.TotalMatrix.ScaleX;
    float scaledY = _y / canvas.TotalMatrix.ScaleY;

    SKMatrix pictureTranslation = SKMatrix.MakeTranslation(scaledX, scaledY);
    canvas.DrawPicture(_svgPicture, ref pictureTranslation);
}
Pinch Gesture – Zoom in/out
Now this part is a bit trickier!
The addition of scale to our image will make us take into account a lot of other things.
So let’s move slowly but surely.
First things first
We need to create a member to save our current scale.
private float _scale = 1f;
Now, remember our method to update image properties?
Since now we are going to update our scale as well, let’s adjust the method:
private void UpdateImageProperties(float x, float y, float? newScale = null)
{
    _x = x;
    _y = y;
    _scale = newScale ?? _scale;
    _canvasView.InvalidateSurface();
}
Note that we’ve added a new nullable parameter with a default value.
Before scaling, adjust the drawing method
We need to adjust our drawing method to handle the zooming.
I’ll omit some of the code and leave only the relevant section.
private void CanvasViewOnPaintSurface(object sender, SKPaintSurfaceEventArgs args)
{
    // ...
    // Code omited for cleanliness
    // ...

    canvas.Scale(ratio);
    canvas.Translate(-bounds.MidX, -bounds.MidY);
    _canvasTranslateMatrix = canvas.TotalMatrix;
    canvas.Scale(_scale);

    float scaledX = _x / canvas.TotalMatrix.ScaleX;
    float scaledY = _y / canvas.TotalMatrix.ScaleY;

    SKMatrix pictureTranslation = SKMatrix.MakeTranslation(scaledX, scaledY);
    canvas.DrawPicture(_svgPicture, ref pictureTranslation);
}
While line 10 is simple and straight forward, we simply add the scale to our canvas matrix,
Let me explain line 9:
Line 8 is helping us to center the image in the middle of the canvas after scaling it down or up to fill the available space in our view.
Once we zoom in/out, we need this matrix (before our own scale) so we can calculate the new values of translation.
It will make more sense in a minute, when we implement the gesture event handler.
But for now, we need to remember to create the private member:
private SKMatrix _canvasTranslateMatrix;
Implement the event handler
To be honest, it took me a while to get to that algorithm.
If you are interested in math behind it, you are welcome to PM me for more details,
But for now, I will leave the math explanation out to focus more on the code than on the math.
private void ZoomPicture(object sender, PinchGestureUpdatedEventArgs e)
{
    switch (e.Status)
    {
        case GestureStatus.Running:
            float pinchX = (float)(e.ScaleOrigin.X * Width);
            float pinchY = (float)(e.ScaleOrigin.Y * Height);

            float newScale = _scale * (float)e.Scale;
            float scaleRatio = newScale / _scale;

            float translatedX = pinchX - _canvasTranslateMatrix.TransX;
            float translatedY = pinchY - _canvasTranslateMatrix.TransY;

            float newX = translatedX - scaleRatio * (translatedX - _x);
            float newY = translatedY - scaleRatio * (translatedY - _y);

            UpdateImageProperties(newX, newY, newScale);
            break;
    }
}
Note the highlighted lines.
This is the place where we use the previously saved matrix.
We need it here to make sure we get the pinch location based on the screen without the translation of the canvas.
Zooming is done
We are almost done, we have our last gesture to implement, which is the shortest and the easiest.
Double Tap Gesture – Revert everything and show the whole picture
Since we already implemented Pan capability and Zoom capability,
This gesture is going to be very easy and very short.
We simply need to call the update method with default values:
private void ZoomToFit(object sender, EventArgs e)
{
    UpdateImageProperties(0, 0, 1);
}
And that’s it! Our Zoom to Fit capability is working!
Let’s Summarize
We now have an app that shows an interactive tree of life.
It is obviously not perfect, and a lot more can be done here to make this more usable,
But the idea was to create the logic itself.
As you can see in the above gif, out tree of life can be panned, can be zoomed in and zoomed out and double tapped to zoom to fit.
Feel free to see the whole code sample on my GitHub.
thanks alot , Do have any idea how to achive oan and zoom on bitmap image with draw on it after that save it
sorry oan ( pan)
Hi Danny,
Thanks for taking interest in my blog. 🙂
As far as I remember, you can also load bitmap images using SkiaSharp.
You can read about it in the official documentation: https://docs.microsoft.com/en-us/xamarin/xamarin-forms/user-interface/graphics/skiasharp/basics/bitmaps
Then, you can use the code in this post to zoom and pan the image.
You will need some more work to draw on the image. Have a look here:
https://docs.microsoft.com/en-us/xamarin/xamarin-forms/user-interface/graphics/skiasharp/bitmaps/drawing
And to save the canvas, you can use this guide:
https://docs.microsoft.com/en-us/xamarin/xamarin-forms/user-interface/graphics/skiasharp/bitmaps/saving
Good luck! Let me know how it went. 🙂
Thanks a lot for this wonderful blog post. I tried implementing it and it worked, however my requirement is a little extension of this.
I want to draw random stuff using finger paint and upload a SVG whenever I click on a button and again draw until the next click where a new svg shall come up. I also need the gesture functions to work for the svgs.
I am stuck at this point as according to the blog we are using certain translations directly on the canvas and hence my finger drawing functionality is not working as expected nor is it responding to a touch event.
If you can give me any tips on how to proceed it will be of great help.
Hi SK,
Thanks for taking interest in my blog.
I hope I understood your question correctly.
SkiaSharp official documentation has a very nice sample app and explanation on how to draw with your finger.
Saving your drawing as an SVG shouldn’t be too much of a problem, but let me know if you can’t figure it out.
Good luck,
Alex.